객체를 화면에 출력하는 방식

org.zerock.domain.MemberVO
@Data
@AllArgsConstructor
public class MemberVO{
	private int mno;
    private String mid;
    private String mpw;
    private String mname;
    private Timestamp regdate;	// java.sql.Timestamp;
}
SampleController에 이를 이용하는 sample2()를 작성한다.
@GetMapping("/sample2")
public void sample2(Model model){
	MemberVO vo = new MemberVO(123, "u00", "p00", "홍길동", 
    	new Timestamp(System.out.currentTimeMillis()));
    model.addAttribute("vo", vo);
}
sample2.html
<html xmlns:th="http://www.thymeleaf.org">
... 생략
<h1 th:text="${vo}">Thymeleaf Test Page</h1>
<div th:utext='${"<h3>" + vo.mid + "</h3>"}'></div>
<div th:text='${"<h3>" + vo.mid + "</h3>"}'></div>
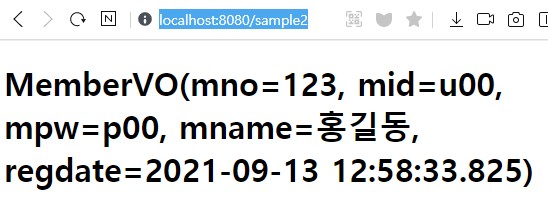

th:text 출력화면
th:text와 th:utext의 비교 내용(추가:소스코드)

리스트를 화면에 출력하기 th:each

화면에서 가장 많이 사용하는 루프의 처리는 th:each를이용해서 처리(th:each는 리스트나 java.util.Iterable, java.util.Map )배열 등을 사용할 수 있다.

th:each에 사용하는 표현식은 th:each="var : ${list}"와 같은 방식으로 작성('var'는 루프를 돌때 n번째 요소를 의미)한다.


org.zorock.controller.SampleController.java
@GetMapping("/sample3")
public void Sample3(Model model){
	List<MemberVO> list = new ArrayList<>();
    for(int i = 0; i < 10; i++){
    	list.add(new MemberVO(123, "u0", "p0" + i + "홍길동" + i +, new Timestamp(System.currentTimeMillis())));
    }
    model.addAttribute("list", list);
}
sample3.html
<html xmlns:th="http://www.thymeleaf.org">
... 생략
	<table style="border:1px solid gray">
		<tr>
			<td>MID</td>
			<td>MNAME</td>
			<td>REGDATE</td>
		</tr>
		<tr th:each="member : ${list}">
			<td th:text="${member.mid}"></td>
			<td th:text="${member.mname}"></td>
			<td th:text="${#dates.format(member.regdate, 'yyyy-MM-dd')}"></td>
		</tr>
	</table>
</body>
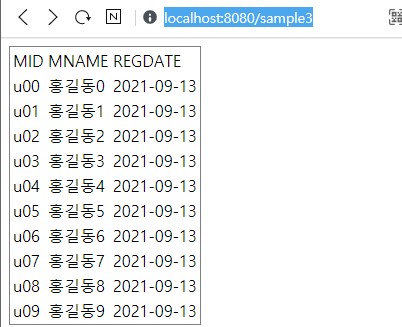
th:each 결과 화면 출력

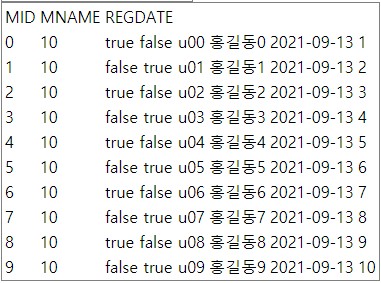
th:each에는 반복의 상태에 대한 변수를 지정하여, 필요한 추가 정보들을 추출할 수 있다. th:each에 현재 상태에 대한 변수를 선언하면 다음과 같은 항목들을 사용할 수 있다.

index 0부터 시작하는 인덱스 번호
count 1부터 시작하는 번호
size 현재 대상의 length 혹은 size
odd/even 현재 번호의 홀수/짝수 여부
first/last 처음 요서인지 마지막 요소인지를 판단
<table style="border:1px solid gray">
	<tr>
		<td>MID</td>
		<td>MNAME</td>
		<td>REGDATE</td>
	</tr>
	<tr th:each="member, iterState : ${list}">
		<td th:text="${iterState.index}"></td>
		<td th:text="${iterState.size}"></td>
		<td th:text="${iterState.odd + ' ' + iterState.even}"></td>
		<td th:text="${member.mid}"></td>
		<td th:text="${member.mname}"></td>
		<td th:text="${#dates.format(member.regdate, 'yyyy-MM-dd')}"></td>
	</tr>
</table>
Thymeleaf의 유틸리티 객체

▣ Expression Basic Objects(표현식 기본 객체)

  • #ctx
  • #vars
  • #locale
  • #httpServletRequest
  • #httpSession

▣ Expression Utility Object(표현식 유틸 객체)

  • #dates
  • #calendars
  • #numbers
  • #strings
  • #objects
  • #bools
  • #arrays
  • #lists
  • #sets
  • #maps
  • #aggregates
  • #messages

표현식 기본 객체는 기존에 JSP에서 application이나 request, session 등을 사용할때 변수가 된다(예를 들어, #vars의 경우 생략한 상태로 주로 사용된다. 따라서 다음 두줄은 동일한 의미를 가진다.

<div>[[${result}]]</div>
<div>[[${#vars.result}]]</div>

유틸리티 객체

Thymeleaf의 표현식은 OGNL(Object-Graph Navigation Language) 표현식을 이용해 데이터를 출력하게 된다.

유틸리티 객체는 기존처럼 메소드를 호출하는 방식으로 사용할 수 있는 객체들이다. 에를 들어, 날짜를 포매팅(formating)하기 위해 다음과 같은 방식으로 사용한다.


org.zerock.controller.SampleController.java
@GetMapping("/sample7")
public void sample7(Model model){
    model.addAttribute("now", new Date());
    model.addAttribute("price", 123456789);
    model.addAttribute("title", "This is a jost Sample");
    model.addAttribute("options", Arrays.asList("AAAA","BBBB","CCCC","DDDD");
}
sample7.html
<!DOCTYPE html>
<html xmlns:th="http://thymeleaf.org">
<head>
<meta content="text/html; charset=UTF-8" http-equlv="Content-Type">
<title>Thymeleaf Test Page</title>
</head>
<body>
    <h1 th:text="${now}"></h1>
    <h1 th:text="${price}"></h1>
    <h1 th:text="${title}"></h1>
    <h1 th:text="${options}"></h1>
</body>
</html>
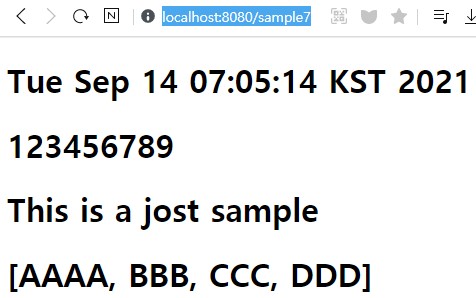
sample7의 결과내용

날짜 관련 #dates, #calendars

날짜 관련 기능은 java.util.Date와 java.util.Calendar의 기능을 이용한다고 이해하면 된다.

<h2 th:text="${#dates.format(now, 'yyyy-MM-dd')}"></h2>
<div th:with="timeValue=${#dates.createToday()}">
	<p>[[${timeValue}]]
</div>

#dates의 #calendars에는 createToday()를 이용해서 변수로 사용할 수도 있다. 위의 코드는 브라우저에서 다음고 ㅏ같은 결과를 만들어 낸다.

숫자 관련 #numbers

Integer나 Double, Float에 대한 포매팅을 처리할 때 주로 사용한다

<h2 th:text="${#numbers.formatInteger(price,3,'COMMA')}"></h2>
<div>
    <p th:text="${#numbers.formatInteger(priceValue,3,'COMMA')}"></p>
    <p th:text="${#numbers.formatDecimal(priceValue,5,10,'POINT')}"></p>
</div>

소수점의 경우 formatInteger를 이용하면 정수 처리가 되기 때문에, 주의해서 사용해야 한다.


문자관련 #strings

문자열을 관련해서 대소문자 변환이나 contains() 등 기본적 기능들 외에 문자열을 결합하는 join이나 리스트로 나누는 listsplit 등의 기능들이 지원된다.

<h1 th:text="${title}"></h1>
<span th:utext="${#strings.replace(title, 's', '<b>s</b>')}"></span>
<ul>
    <li th:each="str:${#strings.listSplit(title, ' ')"}>[[${str}]]</li>
</ul>
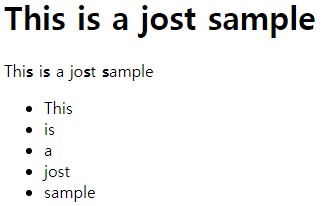
<li th:each="str:${#strings.listSplit(title, ' ')}">[[${str}]]</li>

Thymeleaf 링크 처리

일반적인 웹 페이지의 링크는 크게 두가지로 'http://www...'와 같은 형태의 절대(absolute path)경로와 현재 URL을 기준으로 이용하는 상대(context-relative) 경로이다.


스프링부트에서는 프로젝트를 실행하면 '/'을 기준으로 동작하기 때문에 경로에 대한 스프레스 없이 작성할 수 있지만, WAS에서는 특정 경로에서 프로젝트가 실행되는경우에 문제가 될 수 있다.


Thymeleaf는 이러한 문제를 해결하기 위해 '@{ }'를 이용해 경로에 대한 처리를 자동으로 처리할 수 있다.


링크에 대한 처리는 지금까지 'sample1','/sample2'와 같은 경로들이 존재하므로, 이를 화면에서 처리하는 예제를 보면 다음과 같다.

org.zerock.controller.SampleController.java
@GetMapping("/sample8")
public void sample8(Model model){ }
<ul>
    <li><a th:href="@{http://localhost:8080/sample1}"> 절대경로 sample1</a></li>
    <li><a th:href="@{/sample1}">현재 실행되는 컨텍스트의 경로가 반영 sample1</a></li>
    <li><a th:href="@{~/sample1}">sample1</a></li>
</ul>

'@{http://...}'로 시작하는 코드는 절대 경로 처리에 사용된다.

'@{/sample1'에는 현재 실행되는 컨텍스트의 경로가 반영된다. 만일 컨텍스트의 경로가 '/라면 '/sample1'과 같은 경로가 되지만 컨텍스트의 경로가 'boot05'와 같은 경로라면 '/boot05/sample1'과 같은 경로가 된다.
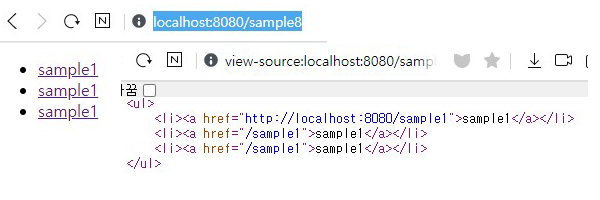
Thymeleaf 링크처리

'@{~/sampl1}'의 경우 현제 프로젝트가 '/' 경로에서 실행되었기 때문에 '@{/sample1}' 차이가 없게 된다.


Thymeleaf의 링크 처리에서 조금 특이한 부분은 파라미터를 전달하는 경우이다. 일반적으로 직접 링크를 생성하기 위해서 '파라미터의 이름=값'의 형태로 작성하지만, Thymeleaf를 이용하면 (이름(키)=값)의 형태로 링크를 생성할 수 있다.

<li><a th:href="@{/sample1(p1='aaa', p2='bbb')}>sample1</a></li>


Thymeleaf의 레이아웃 기능


Predicate는 쉽게 말해 '이 조건이 맞다'고 판단하는 근거를 함수로 제공하는 것이다.

함수형 패러다임을 가진 언어들에서 자주 사용되는데, Java 8 버전에도 포함되어 있다.


Repository에서 Predicate를 파라미터로 전달하기 위해서는 QueryDslPredicateExcutor<T> 인터페이스를 Repository에 추가해 주어야만 한다.


메서드 설명
long count(Predicate) 데이터의 전체 개수
boolean exists(Predicate) 데이터의 전제 여부
Rerable<T> findAll(Predicate) 조건에 맞는 모든 데이터
Page<T> findAll(Predicate) 조건에 맞는 모든 데이터
Iterable<T> findAll(Predicate, Sort) 조건에 맞는 모든 데이터와 정렬
T findOne(Predicate) 조건에 맞는 하나의 데이터

Repository 변경

Repository 인터페이스는 QueryDslPredicateEXecutor<T> 인터페이스를 상속하도록 추가해 주어야 한다.

org.zerock.persistence.BoardRepository.java
public interface BoardRepository extends CrudRepository<Board, Long>, QuerydslPredicateExecutor<Board>{

Predicate 생성 및 테스트

Predicate는 단어적 의미로 단언하다, 확신하다의 의미로, 프로그램적 으로 boolean으로 리턴되는 결과 데이터를 만들어야 한다. 주로 BooleanBuilder를 이용해 생성하는데 사용방법은 테스트 코드를 통해 알아본다.

org.zerock.BootApplicationTests.java
...
import com.querydsl.core.BooleanBuilder;

@RunWith(SpringRunner.class)
@SpringBootTest
class Boot03ApplicationTests {

	...
	
	@Test
	public void testPredicate() {
		String type = "t";
		String keyword = "17";
		
		BooleanBuilder builder = new BooleanBuilder();
		QBoard board = QBoard.board;
		
		if(type.equals("t")) builder.and(board.title.like("%" + keyword + "%"));
		
		// bno > 0
		builder.and(board.bno.gt(0L));
		
		Pageable pageable = PageRequest.of(0, 10);
		Page<Board> result = repo.findAll(builder, pageable);
		
		System.out.println("PAGE SIZE: " + result.getSize());
		System.out.println("TOTAL PAGES: " + result.getTotalPages());
		System.out.println("TOTAL COUNT: " + result.getTotalElements());
		System.out.println("NEXT: " + result.nextPageable());
		
		List<Board> list = result.getContent();
		list.forEach(b -> System.out.println(b));
	}
}
결과
Hibernate: ...
	board0_ where (board0_.title like ? escape '!') and board0_.bno? limit ?
    
Hibernate: ...
	where(board0_.title like ? escape '!') and board0_.bno>?
    
PAGE SIZE: 10
TOTAL PAGES: 4
TOTAL COUNT: 36
NEXT: Page request [number: 1, size 10, sort: UNSORTED]
... 테이블 결과 내용 ...

리턴 타입을 Page<T>로 설정했기 때문에 데이터를 추출하는 SQL과 개수를 파악하는 SQL이 실행되고, 이때 필요한 조건들이 지정되는 것을 볼 수 있다.

'Starter SpringBoot 2.x 보충 내용' 카테고리의 다른 글

JPA Paging(페이지 나누기)  (0) 2021.08.30

JPA Paging 이란?

정의: DB에 저장된 Entity들을 페이지로 나누는 것


DB에 명사적 데이터가 20개가 저장되어 있다고 한다면 프론트에서 'DB에 있는 데이터를 5개씩 분류하여 두번째 파트를 줘!'라고 요청하게 되면 백엔드에서 20개의 데이터를 5개로 분류하여 데이터의 두번째 파트를 프론트에 넘겨준다.

즉 일정 갯수만큼 분류하고, 분류된 부분들 중 특정 부분을 파트로 보내주는 것이 JPA Paging 처리이다.


사용방법

@Query 애너테이션을 통해 SQL native 코드를 작성후 Pageable 타입의 파라미터를 받아 List<T> 컬렉션 타입으로 반환한다.

@Query("SELECT b FROM Board b WHERE b.bno > 0 ORDER BY b.bno DESC")
public List<Board> findBypage(Pageable pageable);

repository의 findBypage() 의 parameter에 Pageable 또는 Pageable의 구현체인 PageRequest를 넣어준다.

@Test
public void testByPaging(){
	Pageable pageable = new PageRequest(0, 10);
    repo.findBypage(pageable).forEach(board -> System.out.println(board));
}


※ 페이지 번호는 0부터 시작하기 때문에 이 코드는 1페이지의 내용을 가져오는 SQL을 다음과 같이 실행하게 된다.

... 생략
board0_ where board0_.bno>0 order by board0_.bno desc limit?


'Starter SpringBoot 2.x 보충 내용' 카테고리의 다른 글

Predicate 준비  (0) 2021.08.31

findByBenGreaterThanOrderByBnoDesc(Long bno) Type

findByBnoGreaterThan(Long bno, Pageable paging) Type

import java.util.Collection;
import java.util.List;

import org.springframework.data.domain.Pageable;
import org.springframework.data.repository.CrudRepository;

import com.zerock.domain.Board;

public interface BoardRepository extends CrudRepository<Board, Long>{
	
	// Sort 인터페이스 타입을 파라미터로 전달할 수 있는 생성자 타입
	// 쿼리 Method()에서 OrderBy 부분없이 Pageable만을 파라미터로 처리
	public List<Board> findByBnoGreaterThan(Long bno, Pageable paging);
}

Pageable 인터페이스는 말 그대로 페이징 처리에 필요한 정보를 제공한다.


보통 가장 많이 사용하는 org.springframework.data.domain.Pageable 인터페이스를 구현한 클래스 중에 PageRequest 클래스로 이용하는 것이다(PageRequest의 경우 스프링부트의 버전에 주의)


스프링부트 2.0의 경우 new PageRequest()는 deprecated이기 때문에 사용하면 안되며, PageRequest.of{ }를 사용해야 한다.


모든 쿼리 메서드의 마지막 파라미터로 페이지 처리를할 수 있는 Pageable  인터페이스와 정렬을 처리하는 Sort 인터페이스를 사용할 수 있다.


예시) 'bno > 0 order by bno desc' 라는 조건을 구현한 findByBnoGreaterThanOrderByBnoDesc() 메서드에 Pageable을 적용하면 다음과 같은 형태가 된다.

com.zerock.persistence.BoardRepository 기본적인 페이징 처리


package com.zerock.persistence;

import java.util.Collection;
import java.util.List;

import org.springframework.data.repository.CrudRepository;

import com.zerock.domain.Board;

public interface BoardRepository extends CrudRepository<Board, Long>{
	public List<Board> findBoardByTitle(String title);
	public Collection<Board> findByWriter(String writer);
	
	// bno > ? ORDER BY bno DESC limit ?, ?
	public List<Board> findByBnoGreaterThanOrderByBnoDesc(Long bno, Pageable paging);	
}

기존 코드와 다른부분은, 파라미터에 Pageable이 추가되어 있고, 리턴 타입으로 Collection<>이 아닌 List<>를 적용하는게 다르다. Pageable 인터페이스가 적용되는 경우, 리턴타입은 org.springframework.data.domain.Slice 타입, org.springframework.data.domain.Page 타입, java.util.List 타입을 이용해 주어야한다.


org.zerock.Boot03ApplicationTests 내 페이징 테스트
import java.util.Collection;
import java.util.List;

import org.springframework.data.domain.Pageable;
import org.springframework.data.repository.CrudRepository;

import com.zerock.domain.Board;

public interface BoardRepository extends CrudRepository<Board, Long>{

	@Autowired
	private BoardRepository repo;

	@Test
	public void testBnoOrderByPaging() {
    
		// spring boot 2.0.0
		Pageable paging = PageRequest.of(0, 10);
		
		Collection<Board> results = repo.findByBnoGreaterThanOrderByBnoDesc(0L, paging);
		results.forEach(board -> System.out.println(board));
	}
}
board0_ where board0_.bno>? order by board0_.bno desc limit

Pageable 인터페이스에는 여러 메서드가 존재하기 때문에 이를 구현하는 대신에 Pageable 클래스를 이용하는 것이 편리하다. 가장 간단한 방법으로는 페이지의 번호와 페이지당 데이터의 수를 지정하는 방식으로 PageRequest.of(0,10)은 첫 번째 페이지(인덱스 번호는 0부터 시작하므로)이고 10건의 데이터를 가져오도록 설정하는 것이다.


실힝되는 SQL을 보면 MySQL의 경우 자동으로 limit이 적용되는 것을 볼 수 있다.


정렬처리에는 Pageable 인터페이스와 같이 Sort 클래스를 이용한다(Sort는 쿼리 메서드에서 OrderBy로 처리해도 되지만, Sort를 이용하면 원하는 방향을 파라미터로 결정할 수 있다는 장점이 있다).


of() 설명
PageRequest.of(int page, int size) 페이지 번호(0부터 시작), 페이지당 데이터 수
PageRequest.of(int page, int size, Sort Direction direction, String ... props) 페이지 번호, 페이지당 데이터의 수, 정렬 방향, 속성(칼럼)들...
PageRequest.of(int page, int size, Sort sort) 페이지 번호, 페이지당 데이터의 수, 정렬 방향
import java.util.Collection;
import java.util.List;

import org.springframework.data.domain.Pageable;
import org.springframework.data.repository.CrudRepository;

import com.zerock.domain.Board;

public interface BoardRepository extends CrudRepository<Board, Long>{
	
	// Sort 인터페이스 타입을 파라미터로 전달할 수 있는 생성자 타입
	// 쿼리 Method()에서 OrderBy 부분없이 Pageable만을 파라미터로 처리
	public List<Board> findByBnoGreaterThan(Long bno, Pageable paging);
}

쿼리 메서드에서 OrderBy 부분 없이 Pageable만을 파라미터로 처리하고 있다. 메서드의 이름에서 정렬과 관련된 조건이 빠진 것은 PageRequest()를 이용해 다음과 같이 처리한다.


import java.util.Collection;

import org.junit.jupiter.api.Test;
import org.junit.runner.RunWith;
import org.springframework.beans.factory.annotation.Autowired;
import org.springframework.boot.test.context.SpringBootTest;
import org.springframework.data.domain.PageRequest;
import org.springframework.data.domain.Pageable;
import org.springframework.data.domain.Sort;
import org.springframework.test.context.junit4.SpringRunner;

import com.zerock.domain.Board;
import com.zerock.persistence.BoardRepository;

@RunWith(SpringRunner.class)
@SpringBootTest
class Boot03ApplicationTests {

	@Autowired
	private BoardRepository repo;
	
	@Test
	public void testBnoPagingSort() {
		Pageable paging = PageRequest.of(0, 10, Sort.Direction.ASC, "bno");
		
		Collection<Board> results = repo.findByBnoGreaterThan(0L, paging);
		results.forEach(board -> System.out.println(board));
	}
	
}

Page<T> 타입

Spring Data JPA에서 결과 데이터가 여러 개인 경우 List<T> 타입을 이용하기도 하지만, Page<T>타입을 이용하면 SpringMVC와 연동할 때 상당한 편리함을 제공한다.

com.zerock.persistence.BoardRepository 인터페이스에 페이징, 정렬하기
package com.zerock.persistence;

import java.util.Collection;
import java.util.List;

import org.springframework.data.domain.Pageable;
import org.springframework.data.repository.CrudRepository;

import com.zerock.domain.Board;

public interface BoardRepository extends CrudRepository<Board, Long>{
	
	// Sort 인터페이스 타입을 파라미터로 전달할 수 있는 생성자 타입
	// 쿼리 Method()에서 OrderBy 부분없이 Pageable만을 파라미터로 처리
	public List<Board> findByBnoGreaterThan(Long bno, Pageable paging);
}
테스트 코드 내용 변경
package com.zerock;

import java.util.Collection;
import java.util.List;

import org.junit.jupiter.api.Disabled;
import org.junit.jupiter.api.Test;
import org.junit.runner.RunWith;
import org.springframework.beans.factory.annotation.Autowired;
import org.springframework.boot.test.context.SpringBootTest;
import org.springframework.data.domain.Page;
import org.springframework.data.domain.PageRequest;
import org.springframework.data.domain.Pageable;
import org.springframework.data.domain.Sort;
import org.springframework.test.context.junit4.SpringRunner;

import com.zerock.domain.Board;
import com.zerock.persistence.BoardRepository;

@RunWith(SpringRunner.class)
@SpringBootTest
class Boot03ApplicationTests {

	@Autowired
	private BoardRepository repo;
	
	@Test @Disabled
	public void testBnoPagingSort() {
		Pageable paging = PageRequest.of(0, 10, Sort.Direction.ASC, "bno");
		
		Collection<Board> results = repo.findByBnoGreaterThan(0L, paging);
		results.forEach(board -> System.out.println(board));
	}
	
	@Test
	public void testBnoPagingSort() {
		// spring 2.0
		Pageable paging = PageRequest.of(0, 10, Sort.Direction.ASC, "bno");
		
		Page<Board> results = repo.findByBnoGreaterThan(0L, paging);
		
		System.out.println("PAGE SIZE: " + results.getSize());
		System.out.println("TOTAL PAGES: " + results.getTotalPages());
		System.out.println("TOTAL COUNT: " + results.getTotalElements());
		System.out.println("NEXT: " + results.nextPageable());
		
		List<Board> list = results.getContent();
		
		list.forEach(board -> System.out.println(board));
	}
}

Page<Board>는 단순 데이터만을 추출하는 용도가 아닌, 흔히 웹에서 필요한 데이터를 추가적으로 처리해준다.

메서드 설명
int getNumber() 현재 페이지의 정보
int getSize() 현 페이지의 크기
int getTotalPages() 전체 페이지의 수
int getNumberOfElements() 결과 데이터 수
boolean hasPreviousPage() 이전 페이지의 존재 여부
boolean hasNextPage() 다음 페이지의 존재 여부
boolean isLastPage() 마지막 페이지 여부
Pageable nextPageable() 다음 페이지 객체
Pageable previousPageable 이전 페이지 객체
List<T> getContent() 조회된 데이터
boolean hasContent() 결과 존재 여부
Sort getSort() 검색 시 사용된 Sort 정보
테스트 코드의 실행 결과
PAGE SIZE: 10
TOTAL PAGES: 20
TOTAL COUNT: 200
NEXT: Page request [ number: 1, size 10, sort: bno: ASC]
Board(bno=1, title=제목 테스트용 1, writer=user1, ...
...이하생략...

'Starter SpringBoot 2.x' 카테고리의 다른 글

부등호 처리  (0) 2021.08.21
Eclipse 환경설정  (0) 2021.08.21

가져오는 데이터의 순서를 지정하기 위해서는 'OrderBy' + 속성 + 'Asc or Desc'를 이용해서 작성할 수 있다.


예) 게시물의 bno가 특정번호보다 큰 게시물을 bno 값이 역순으로 처리하고 싶다면 다음과 같은 형태가 된다.

org.zerock.persistence.BoardRepository 인터페이스에 bno 역순 정렬
public interface BoardRepository extends CrudRepository<Board, Long>{
	public List<Board> findBoardByTitle(String title);
	public Collection<Board> findByWriter(String writer);
	
	// bno > ? ORDER BY bno DESC
	public Collection<Board> findByBnoGreaterThanOrderByBnoDesc(Long bno);
}
결과 board0_ where board0_.bno? order by board0_.bno desc

쿼리 메서드에서는 '>'와 '<' 같은 부등호는 'GreateThar'과 'LessThan'을 이용하여 처리할 수 있다.


예시로 게시물의 title에 특정 문자가 포함되어 있고 bno가 특정 숫자 초과인 데이터를 조회한다면 다음과 같은 형태를 가진다.

com.zerock.persistence.BoardRepository
public interface BoardRepository extends CrudRepository<Board, Long>{    
	// title LIKE % ? % AND BNO > ?
	public Collection<Board> findByTitleContainingAndBnoGreaterThan(String keyword, Long bno);
}

쿼리 메서드를 이용해서 제목에 '5' 포함되어 있고, 게시물의 번호가 50보다 큰 데이터를 조회한다면 다음과 같은 형태가 된다.

org.zerock.Boot03ApplicationTests.java 내 제목과 부등호 검색
package com.zerock;

import java.util.Collection;

import org.junit.jupiter.api.Test;
import org.junit.runner.RunWith;
import org.springframework.beans.factory.annotation.Autowired;
import org.springframework.boot.test.context.SpringBootTest;
import org.springframework.test.context.junit4.SpringRunner;

import com.zerock.domain.Board;
import com.zerock.persistence.BoardRepository;

@RunWith(SpringRunner.class)
@SpringBootTest
class Boot03ApplicationTests {

	@Autowired
	private BoardRepository repo;
	
	@Test
	public void testByTitleAndBno() {
		Collection<Board> results = repo.findByTitleContainingAndBnoGreaterThan("5", 50L);
		
		results.forEach(board -> System.out.println(board));
	}
}


'Starter SpringBoot 2.x' 카테고리의 다른 글

페이징 처리와 정렬  (0) 2021.08.22
Eclipse 환경설정  (0) 2021.08.21

Eclipse UTF-8(Encoding) 설정

[ 출처 - 위키백과 ]
UTF-8 인코딩은 유니코드 한 문자를 나타내기 위해 1바이트에서 4바이트까지를 사용한다. 예를 들어서, U+0000부터 U+007F 범위에 있는 ASCII 문자들은 UTF-8에서 1바이트만으로 표시된다. 4바이트로 표현되는 문자는 모두 기본 다국어 평면(BMP) 바깥의 유니코드 문자이며, 거의 사용되지 않는다. UTF-16과 UTF-8 중 어느 인코딩이 더 적은 바이트를 사용하는지는 문자열에서 사용된 코드 포인트에 따라 달라지며, 실제로 DEFLATE와 같은 일반적인 압축 알고리즘을 사용할 경우 이 차이는 무시할 수 있을 정도이다. 이러한 압축 알고리즘을 사용하기 힘들고 크기가 중요할 경우 유니코드 표준 압축 방식을 대신 사용할 수 있다.

Window > Peperences > General > Content Types > Java Class File > Default encoding: UTF-8

Window > Peperences > General > Spelling > Encoding: ● Default(UTF-8)

Window > Peperences > General > Workspace > Text file encoding > ● Other: UTF-8▼

Window > Reperences > Web > CSS Files > Encoding: ISO 10646/Unicode(UTF-8) ∨

Window > Reperences > Web > HTML Files > Encoding: ISO 10646/Unicode(UTF-8) ∨

Window > Reperences > Web > JSP Files > Encoding: ISO 10646/Unicode(UTF-8) ∨

Window > Reperences > XML > XML Files > Encoding: ISO 10646/Unicode(UTF-8) ∨


'Starter SpringBoot 2.x' 카테고리의 다른 글

페이징 처리와 정렬  (0) 2021.08.22
부등호 처리  (0) 2021.08.21

+ Recent posts